Wednesday, May 21, 2008

Easier Done than Said

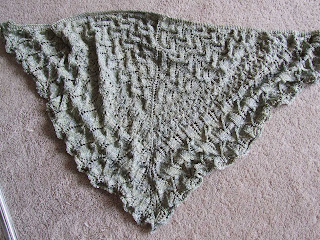
Heeeere she is... the Norwegian Woods scarf in peridot sea silk with 8/0 silver lined crystal triangle beads.

And a closer picture of the beaded scallops..


Sorry I couldn't get a modeled shot, but it was just me taking the pics this morning. The black chair had to do.

Now to answer the excellent questions from the last post...

Query: Why did you choose to pin the scallop points with individual pins, rather than threading additional blocking wires through the points, and gently curving those wires? This is an honest question, not a critique! The shawl is stunning, and I hope to make one of my own.

Kristen, this is such a good question and one that I have given a lot of thought. I have tried blocking with wires, once, briefly, but found unfortunately that my blocking wires (you may have more flexible ones than I do however) did not bend to the extent that I needed to form the rather deep scallops. I could have used them if I wanted to bend them forever to that shape.. hmm, that is a thought!

As the Moonshadow has somewhat the same shape edge to block, I did try several alternate methods of blocking those scallops. The best "run-through" method turned out to be fishing line, which makes the edge more substantial, but I STILL had to use pins to get the shape to stay properly round. Lesson learned.. this time, only humble pins, which seem to get around the curves the best of any method, as far as I am concerned. You could certainly use blocking wires to line up the edges of the curves into a straight line, but I feel that this might give your scallops a pointy look if you aren't careful.

I like the very organic looking curves I get with pins. But please... experiment with other methods, and please report back to me about what you find. This is all about learning, after all.

jenknits, I did leave out the part about endless pinning and repinning to get the darn thing symmetrical! Now you know... the secret is out.

Happy scalloping day to all...

Tuesday, May 20, 2008

Scallops for All, and All for Scallops

Several folks have asked me how I get the edge of Norwegian Woods to have such nicely rounded scallops, and since I just finished my knitalong scarf, I thought I would post some photos of the blocking process.

Let's see... am I ready to start? Finished scarf, check. Pins, check. Wires, check. Helpful gremlin, check. I think I am ready!

Another pic of the crumpled Norwegian Woods, for comparison and because I love crumpled up lace.

I don't show the next step, but you can picture me dunking the scarf in a warm tub of water with a little Eucalan added, then lifting out the shawl (complete with seaweedy aroma... don't you love sea silk?) and rolling it in a towel to semi-dry.

The first step is to anchor the top of the shawl, which is very conveniently done with blocking wires. These particular wires are actually TIG welding rods, and you can see the little flat place near the tip that "real" blocking wires won't have. However, since I got a pound of these for less than $10, I have decided that I do not mind the little flat place near the tip.

To use, simply thread the wire in and out of the eyelets that line the top border. You can do the same with fishing line or weed whacker line if that's your preference.

If you need to use two wires for the width of the piece, just overlap by putting both wires under the same thread, then continue.

Now stretch the top widthwise over the wires (or line), and at this point, do measure to see if they are even on both sides of the center seam. Blocking truly is nicer when symmetrical! I put pins along the top wires to hold them steady for the next step.

Now, stretch the piece lengthwise. A good rule of thumb for triangle shawls (or scarves) is length is approximately one-half of total width. But this is not a hard and fast rule... you can monkey with this if needed.

You can see the bottom point held with one lonely little pin.

Now go around and stretch out all the little points that shall become scallops. You are trying for evenness, not perfection at this stage. Try to get the points in a straight line, and do measure to see if you are stretching the sides out evenly. Allow some time for this step. It always takes more time than you think!

Close up of the pointy bits that will be scallops.

Now... make scallops!!! Using the center pin as a place holder, spread the sides of each point into rounded loveliness and use one pin on each side of the scallop to hold it there. I like to pin the sides downward and at a slight angle, as you see here. Again, strive for organic roundness, not pinpoint perfection. Unless of course that makes you happy...

Here you can see the rounded, pinned out scallops all the way around.


... And an aerial view of the same. Now wait until it is dry.

Tomorrow... the finished Norwegian Woods scarf!

Monday, May 12, 2008

Sneak Peek

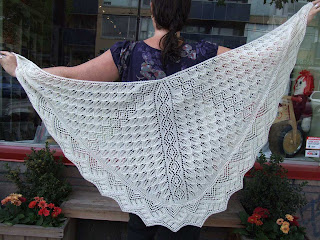
Harbour Lights... she is now finito. Wanna see ????


Model: Christa Giles of podcast fame. Thank you, Xta!

The shawl is basically a top down triangle shape with a slim center lace panel, meant to portray a lighthouse, with the beams (seen above beaming over lovely Christa's right shoulder) shining down all the way to the waves playfully dancing at the edge. Beads are placed throughout the shawl with the crochet hook add-as-you-go method, and perhaps best of all, the shawl takes only 750 yards of fingering weight yarn!

I used a gorgeous fingering weight alpaca yarn from Alberta Rose farm (in Alberta, interestingly enough!), carried at Three Bags Full yarn shop in Vancouver. Shelley Mackie of Fun Knits has some amazing cashmere/silk yarn that is destined to be kitted up with this shawl pattern... so do look for that at the FibreFest/Knit-Out that is happening in Victoria in June.